 |
 |
 |
 |
Creating a special edge around photos or imagesFor Version 3
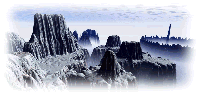
This tip is pretty basic and involves removing the sharp edges around an image. As you can see, the original image was altered so as to remove the sharp rectangular edges. The result is a blending of the image's edges into the background. This effect works best against a white background. The trick is to create a mask for the image you wish to alter. In this case, a mask with a symmetrical border was created. The mask was then blurred to the desired effect. The mask was created by first loading in the original image (Set to 16 million colors) and resampling to the desired size.
The next step was to create an empty mask . Your newly formed mask should have a white background, if not apply the negative image feature . Add a black border to the mask, you will have to resize the mask back to original size.
|
||||
|
|
||||
|
Empty Mask with Black Border Next "blur more" the mask for the desired effect. |
||||
 |
||||
|
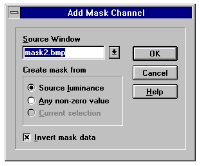
Finished Mask Select the original image and then add the mask , make sure the invert mask is checked in the mask dialog box. Apply , change the brightness to 100. You've now created the image, save as usual. This is the "Add Mask" Dialog Box. A couple things to note:
 |
||||


|
Copyright © 1998 - 2001 John K. Hart, All Rights Reserved. |